Configuring server without a Static IP
No static IP. No port forwarding. Just a domain and a daemon running on your machine. Here is how Cloudflare Tunnel makes self-hosting from home actually work.

A step-by-step guide to Cloudflare Tunnel on any Linux machine
I run this blog on a Raspberry Pi sitting on my desk. No data center, no VPS, no $10/month to DigitalOcean. Just a tiny ARM board plugged into my router, humming quietly serving pages to the internet.
The obvious problem with that setup: my ISP does not give me a static IP. My home IP changes whenever it feels like it, which means I cannot just point a DNS A record at it and call it done. And even if I could, I would still need to poke holes through my router firewall and deal with port forwarding, which is its own headache.
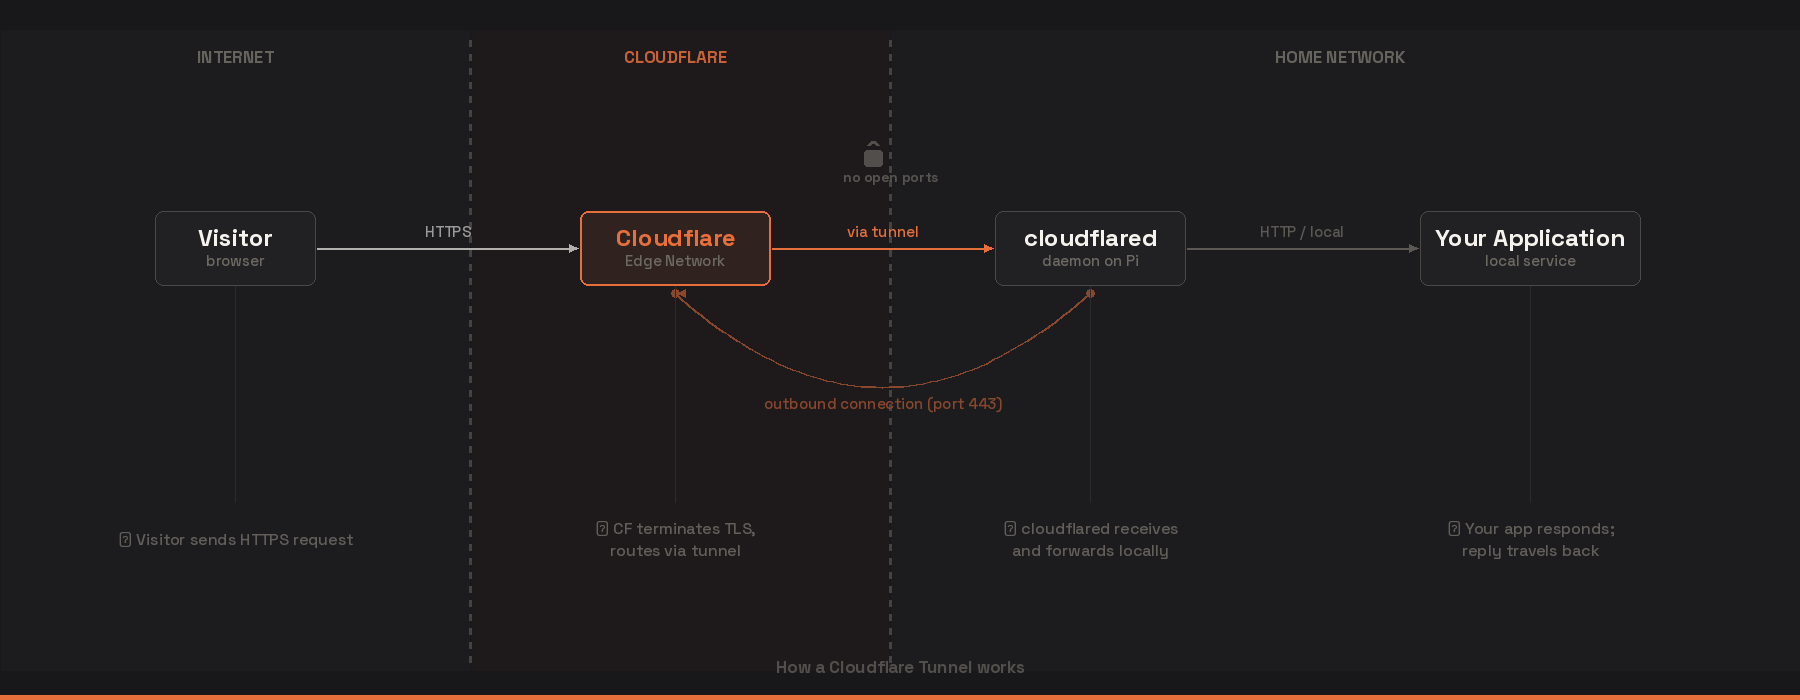
Cloudflare Tunnel solves all of this cleanly. No open ports. No static IP. No dynamic DNS scripts running on a cron job. You install a small daemon called cloudflared on your server, it opens an outbound connection to Cloudflare’s network, and Cloudflare routes incoming requests for your domain back through that connection to your machine. From the outside, your site just looks like any other Cloudflare-proxied site. The best part is: All of the SSL stuff is handled by cloudflare edge network!!
What You Need Before Starting
- A domain you own that is already using Cloudflare as its nameserver. If you bought your domain somewhere like Namecheap or GoDaddy, you can transfer DNS management to Cloudflare for free. Cloudflare just needs to be authoritative for your zone.
- A Cloudflare account (also free).
- A Linux machine running your server. This guide uses Debian/Ubuntu and references a Raspberry Pi, but it works on any Linux box.
- Something actually running locally that you want to expose. In my case it is Nginx on port 80, sitting in front of Ghost. But it could be anything: a plain Node app, a Flask API, a Plex server, whatever.
Step 1: Install cloudflared
cloudflared is the daemon that creates and maintains the tunnel. Cloudflare publishes official packages for most platforms.
On any Debian-based system:
# Download the latest cloudflared .deb package
curl -L https://github.com/cloudflare/cloudflared/releases/latest/download/cloudflared-linux-arm64.deb \
  -o cloudflared.deb

# Install it
sudo dpkg -i cloudflared.deb
If you are on a regular x86 machine, swap arm64 for amd64 in that URL.
After installation, verify it is working:
cloudflared --version
You should see something like cloudflared version 2024.x.x. Good, it is installed.
Step 2: Log In to Cloudflare
Next, you need to authenticate cloudflared with your Cloudflare account. This is a one-time browser-based flow.
cloudflared tunnel login
This prints a URL in your terminal. Open it in a browser, log in to your Cloudflare account, and select the domain you want to use. Cloudflare will then drop a credentials file at ~/.cloudflared/cert.pem on your machine. That file is what proves to Cloudflare that your machine is authorized to create tunnels for that zone.
If you are running this on a headless server with no browser, just copy the URL and paste it into a browser on another machine. The credentials get written to the server, not the machine you opened the URL on.
Step 3: Create the Tunnel
A tunnel is a named object in Cloudflare’s system. You create it once and it generates a persistent ID that you reuse every time the daemon starts.
cloudflared tunnel create my-home-server
Replace my-home-server with whatever name you want. You will see output like:
Created tunnel my-home-server with id a1b2c3d4-e5f6-7890-abcd-ef1234567890
Save that UUID. Cloudflare also writes a credentials JSON file for this tunnel:
~/.cloudflared/a1b2c3d4-e5f6-7890-abcd-ef1234567890.json
That file contains the secret that lets cloudflared authenticate as this specific tunnel. You will reference it in the config shortly.
Step 4: Write the Config File
The config file is where you define what the tunnel should route and where to. Create it at /etc/cloudflared/config.yml (you will likely need to create the directory first).
sudo mkdir -p /etc/cloudflared
sudo nano /etc/cloudflared/config.yml
Here is a minimal config that proxies all traffic for your domain to a local Nginx instance:
tunnel: a1b2c3d4-e5f6-7890-abcd-ef1234567890
credentials-file: /etc/cloudflared/a1b2c3d4-e5f6-7890-abcd-ef1234567890.json

ingress:
  - hostname: yourdomain.com
    service: http://localhost:80
  - hostname: www.yourdomain.com
    service: http://localhost:80
  - service: http_status:404
A few things to understand here:
tunnel is the UUID you got when you created the tunnel. This tells cloudflared which tunnel to connect as.
credentials-file is the path to the JSON credentials file. You will need to copy this from ~/.cloudflared/ to /etc/cloudflared/ so the service can find it when it runs as root:
sudo cp ~/.cloudflared/a1b2c3d4-*.json /etc/cloudflared/
ingress is where you define routing rules. Cloudflare evaluates these top to bottom. Each rule matches a hostname and forwards the request to a service, which is just a URL on your local machine. The last rule is always a catch-all. If a request comes in that does not match any of your rules, it needs to go somewhere, so returning a 404 is the safest default.
If you are running multiple services on the same machine, you can route different subdomains to different ports:
ingress:
  - hostname: yourdomain.com
    service: http://localhost:2368    # Ghost running directly
  - hostname: api.yourdomain.com
    service: http://localhost:3000    # A Node API
  - hostname: files.yourdomain.com
    service: http://localhost:8080    # Something else
  - service: http_status:404
Each rule is totally independent. Cloudflare handles TLS termination at the edge, so all your local services just need to speak plain HTTP.
Step 5: Point Your DNS at the Tunnel
For Cloudflare to actually route traffic to your tunnel, you need a DNS record that points to it. Cloudflare provides a special CNAME for this.
The easiest way is through the cloudflared CLI:
cloudflared tunnel route dns my-home-server yourdomain.com
cloudflared tunnel route dns my-home-server www.yourdomain.com
This creates a CNAME record in your Cloudflare DNS zone pointing yourdomain.com to a1b2c3d4-e5f6-7890-abcd-ef1234567890.cfargotunnel.com. You can see these records in the Cloudflare dashboard under DNS if you want to verify.

Because this CNAME points to Cloudflare’s own infrastructure (not your home IP), it works fine as a proxy origin. Cloudflare knows to look up which tunnel that UUID belongs to and send requests through it.
Step 6: Run It as a System Service
At this point your tunnel works. You can test it manually:
cloudflared tunnel --config /etc/cloudflared/config.yml run
If your server is running and your DNS is set up, you should be able to hit your domain in a browser and see your site. But running it manually means it dies when you close the terminal. You want this running automatically on boot, and restarting on failure.
cloudflared has a built-in command to install itself as a systemd service:
sudo cloudflared service install
This creates /etc/systemd/system/cloudflared.service and hooks it into systemd. Now start it and enable it:
sudo systemctl start cloudflared
sudo systemctl enable cloudflared
Check the status:
sudo systemctl status cloudflared
You should see active (running). If not, the logs will tell you what went wrong:
sudo journalctl -u cloudflared -f
The -f flag follows the log in real time, so you can watch it connect and start serving traffic.
Step 7: Verify Everything Is Working
Run through this checklist:
1. Check that cloudflared sees the tunnel as healthy
cloudflared tunnel info my-home-server
This shows the tunnel status and the connections it has established. A healthy tunnel typically opens four connections spread across different Cloudflare data centers for redundancy.
2. Check that DNS resolves correctly
dig yourdomain.com CNAME
You should see it resolving to <uuid>.cfargotunnel.com. If you still see your old A record here, wait for DNS propagation or flush your local resolver.
3. Hit your site in a browser
Open https://yourdomain.com. The lock icon in your browser confirms TLS is working. Cloudflare issues and manages the certificate automatically via its Universal SSL. You did not have to touch Certbot or Let’s Encrypt at all.
4. Check the response headers
Open developer tools and look at the response headers. You should see cf-ray in there, which confirms the response came through Cloudflare’s edge.
How This All Fits Together
Visitor’s browser makes a request to yourdomain.com. That DNS record points to Cloudflare’s network (via the CNAME). Cloudflare’s edge receives the request over HTTPS, terminates TLS, and looks up which tunnel is registered for that hostname. It finds your tunnel UUID and routes the request through the persistent outbound connection that cloudflared established from your Pi. Your Pi receives a plain HTTP request, Nginx handles it, Ghost generates the response, and it travels back the same way: through the tunnel, out to Cloudflare’s edge, and back to the visitor over HTTPS.
Your home network never sees an inbound connection from the internet. The firewall never opened. Your ISP never assigned you a static IP. From your Pi’s perspective, it just made an outbound connection to Cloudflare and kept it alive. Everything else is Cloudflare’s problem.